
How to Smooth 3D Prints [+Techniques by Material]
![How to Smooth 3D Prints [+Techniques by Material]](https://ufc-dtc-cms.oss-accelerate.aliyuncs.com/blog/20240704/231219_7eutpumh7.webp)
Learn how to smooth 3D prints for better appearance, performance, and durability. This guide covers sanding, vapor smoothing, and resin coating—plus how to choose the best method for PLA, ABS, PETG, and resin.
Introduction
In 3D printing, a smooth finish isn’t just for show—it can define the success of your part. From functional prototypes to final products, surface quality impacts both performance and appearance.
This guide breaks down the most effective smoothing techniques—like sanding, vapor smoothing, and coating—so you can choose the right method for your material and goals.
At Unionfab, we offer professional post-processing services that take your prints from rough to refined—ready for production or presentation.
Why Smooth 3D Prints
Layer lines, seams, and rough textures are more than cosmetic flaws—they affect how your part fits, moves, and holds up over time.
Whether you're creating a display model or a working component, smoothing your prints improves aesthetics, reduces friction, and enhances durability. It also makes painting and coating far easier and more consistent.
A smooth surface means fewer problems, better performance, and a more polished final result.
Surface Quality = Better Prints
A refined finish improves your 3D prints in every way that matters:
Looks Better: Clean, polished surfaces elevate the visual appeal of models, props, and presentation pieces.
Works Better: Smoothing improves fit and reduces friction—critical for moving parts and assemblies.
Lasts Longer: A smooth surface distributes stress more evenly, improving structural integrity and reducing wear.
Finishes Easier: Coatings, paint, and plating adhere more evenly to a well-prepped surface, saving time in post-processing.
In short, smoothing is a smart upgrade—for both form and function.
Choosing the Right Smoothing Method
Not all 3D printing materials respond the same way to post-processing. Selecting the appropriate smoothing technique depends on the material type, application needs, and available tools. Use the table below to quickly identify the best method for your prints:
Material | Recommended Methods | Difficulty | Notes |
|---|---|---|---|
PLA | Sanding, Epoxy Coating | Easy | Avoid solvent smoothing; PLA is resistant |
ABS | Acetone Vapor Smoothing | Medium | Flammable; use in well-ventilated areas |
Resin | Sanding + UV Resin Coating | Moderate | Protective gear (gloves/mask) required |
PETG | Sanding Only | Easy | Chemical smoothing is less effective |
Pro Tip: For consistent and professional results, consider outsourcing to post-processing experts like Unionfab.
How to Smooth 3D Prints: Preparation
Before smoothing your 3D prints, proper preparation ensures better, faster, and safer results. The most critical step? Choosing the right material.
Choose the Right Material for Post-Processing
Different materials respond differently to smoothing techniques, so matching your material to the right method is essential:
PLA: Easy to print and ideal for sanding and epoxy coating. Avoid solvents.
ABS: Compatible with acetone vapor smoothing; great for functional parts. Requires ventilation.
PETG: Tough and flexible, but best smoothed via sanding—chemical options are limited.
Resin: Needs careful sanding and optional UV resin coating. Always use gloves and masks.
Tip: Consider your project’s end-use—decorative models prioritize appearance, while functional parts need structural durability and finish compatibility.
Choosing the Right Print Resolution
Resolution sets the stage for how smooth your print can be—before any sanding or polishing begins.
High Resolution (Low Layer Height): Best for fine details and smooth finishes. Ideal for small, intricate models, but takes longer to print and uses more material.
Medium Resolution: Strikes a good balance between detail and speed. Great for functional prototypes and everyday prints.
Low Resolution (High Layer Height): Faster and more efficient for large or rough drafts—just expect more visible layer lines.
Choose based on what matters most: detail, speed, or material efficiency.
Spotting Imperfections Before You Smooth
A smart smoothing job starts with knowing where to focus.
Inspect Closely: Look for common issues like lines, blobs, or seams—especially on visible areas.
Prioritize Smartly: Smooth the parts that matter most, like faces on miniatures or fitting surfaces on functional parts.
Mark the Trouble Spots: Use photos or markers to flag areas before you begin. It saves time and ensures nothing gets missed.

Sanding: The Fundamental Smoothing Technique
Sanding is one of the most accessible and effective ways to smooth 3D prints, especially for materials like PLA, PETG, and ABS. It removes visible layer lines and prepares the surface for painting or coating.

Source: support.formlabs.com
Recommended Materials
Best for: PLA, PETG, ABS
Not ideal for: Resin (due to brittleness)
Grit Progression Guide
To achieve a smooth finish, use multiple sandpaper grits in stages:
Stage | Grit Range | Purpose |
|---|---|---|
Initial Sanding | 100–200 | Remove major layer lines & defects |
Medium Sanding | 400–600 | Refine surface, remove scratches |
Fine Finishing | 800–1500 | Prepare for polishing or coating |
Polishing | 2000+ | Achieve glossy, smooth surface |
Wet Sanding vs. Dry Sanding
Method | Advantages | Considerations |
|---|---|---|
Wet Sanding | Reduces dust, smoother results, prevents overheating | Requires water cleanup; slower process |
Dry Sanding | Faster and simpler; no water needed | Can generate heat and fine dust |
Always wear a dust mask and work in a ventilated area for safety.
Step-by-Step Workflow
Start with coarse grit (100–200) to knock down prominent lines.
Work progressively through medium and fine grits.
Use water for wet sanding during higher grit stages.
Finish with polishing if a glossy appearance is desired.
Optional: Apply epoxy or primer afterward for enhanced smoothness.
Image: Example of multi-stage sanding in action__Source: support.formlabs.com_
Chemical Smoothing: Advanced Technique
Chemical smoothing uses solvents to partially dissolve the surface of 3D printed parts, resulting in a glossy, uniform finish. This method is especially effective for ABS and resin prints, offering a clean, professional appearance without extensive manual labor.
How It Works
The solvent softens surface layers, allowing them to level out. As it evaporates, the smoothed surface re-solidifies, eliminating visible layer lines.
Material-Solvent Compatibility
Material | Solvent | Method | Finish |
|---|---|---|---|
ABS | Acetone | Vapor smoothing | Glossy, seamless surface |
PLA | IPA or PLA-specific solvents | Light wiping/soaking | Mild effect, limited use |
Resin | Alcohol-based wash + polishing | Manual application | Smooth, matte to satin |
Note: PLA is not well-suited to solvent smoothing. Sanding or coating methods are usually more effective.
Safety Guidelines
Ensure good ventilation at all times
Wear solvent-resistant gloves and protective eyewear
Keep solvents away from open flames and heat sources
Use containers resistant to chemical corrosion
Post-Smoothing Care
Allow prints to dry fully before handling
For vapor methods, ensure all solvent residue has evaporated (2–4 hours recommended)
Consider applying primer or sealant for protection and enhanced finish
Common Chemical Smoothing Methods
Acetone Vapor Smoothing (ABS): Effective for ABS prints, this method involves exposing the print to acetone vapor, which melts and smooths the outer layer.

Source: engineerdog.com
Isopropyl Alcohol Smoothing (PLA): Brushing or spraying isopropyl alcohol helps smooth PLA prints, although the results may vary based on the specific PLA formulation.
Specialized Smoothing Solutions: Commercially available solutions designed for specific materials can provide consistent and effective smoothing results.
Safety Precautions
Ventilation: Always perform chemical smoothing in a well-ventilated area to avoid inhaling harmful fumes.
Protective Gear: Wear gloves, goggles, and, if necessary, a respirator to protect against chemical exposure.
Fire Safety: Keep solvents away from open flames and high heat sources, as many are highly flammable.
Proper Disposal: Dispose of used solvents and chemical residues according to local regulations to minimize environmental impact.By following these guidelines and safety precautions, chemical smoothing can significantly enhance the surface quality of your 3D prints, offering a smooth, polished finish ideal for both aesthetic and functional applications.
Other Common Smoothing Techniques
In addition to sanding and chemical methods, several other techniques can improve surface finish depending on the material and use case.
Heat Treatment
Using heat to slightly melt the surface can help reduce layer lines, especially for PLA and ABS.

Source: news.mit.edu
Heat Gun: Move a heat gun evenly over the surface on a low setting. It’s quick but requires precision to avoid warping.
Oven Heating: Heat the print in an oven at 60–80°C for a few minutes. Monitor constantly to prevent deformation.
Resin Coating
Ideal for both visual appeal and surface sealing.

Source: pinterest.com
UV Resin: Brush or dip the part in UV-curable resin, then cure under UV light. Great for SLA prints, but apply carefully to avoid drips or uneven coating.
Epoxy Coating: Mix and apply epoxy resin by hand. Once cured, it offers a durable, glossy finish. Best suited for display pieces or mechanical parts.
Filler Primers
Spray-on filler primers help fill small gaps and layer lines. Once dry, lightly sand the surface for a smooth, paint-ready finish. Use in a ventilated area and wear protective gear.
These advanced methods are especially useful when sanding isn’t enough or when a flawless finish is essential.
How to Smooth PLA 3D Prints
PLA is one of the most commonly used 3D printing materials—but also one of the most challenging to smooth effectively.
Challenges of Smoothing PLA
Low Heat Resistance: PLA softens easily, so heat-based methods must be applied with extreme caution to avoid deformation.
Limited Chemical Compatibility: Common solvents like acetone or IPA have minimal effect on PLA. Specialized PLA solvents exist but are less accessible and harder to control.
Best Techniques for PLA
Sanding: Still the most reliable method—start with coarse grit and progress to finer grits for best results.
Epoxy or UV Resin Coating: Excellent for sealing layer lines and adding gloss. Ideal for visual models.
Filler Primer: Use as a base coat before painting. It helps smooth out minor imperfections with minimal effort.
While PLA isn’t as easy to smooth chemically as ABS, combining sanding with coating techniques can still achieve impressive results.
Conclusion
A smooth surface is more than just a visual upgrade—it enhances mechanical performance, fit, durability, and post-processing compatibility. From sanding and chemical smoothing to heat treatment and resin coating, each method has its own strengths and best-use scenarios.
To choose the right technique:
Consider your material (PLA, ABS, PETG, resin)
Match the method to your project goals—visual appeal, mechanical strength, or ease of post-processing
Evaluate available tools, safety requirements, and desired finish quality
By taking the time to properly smooth your prints, you not only improve their look, but also unlock their full functional potential.
For consistent, professional results—especially for end-use parts—consider Unionfab’s expert post-processing services, tailored to your material and application needs.
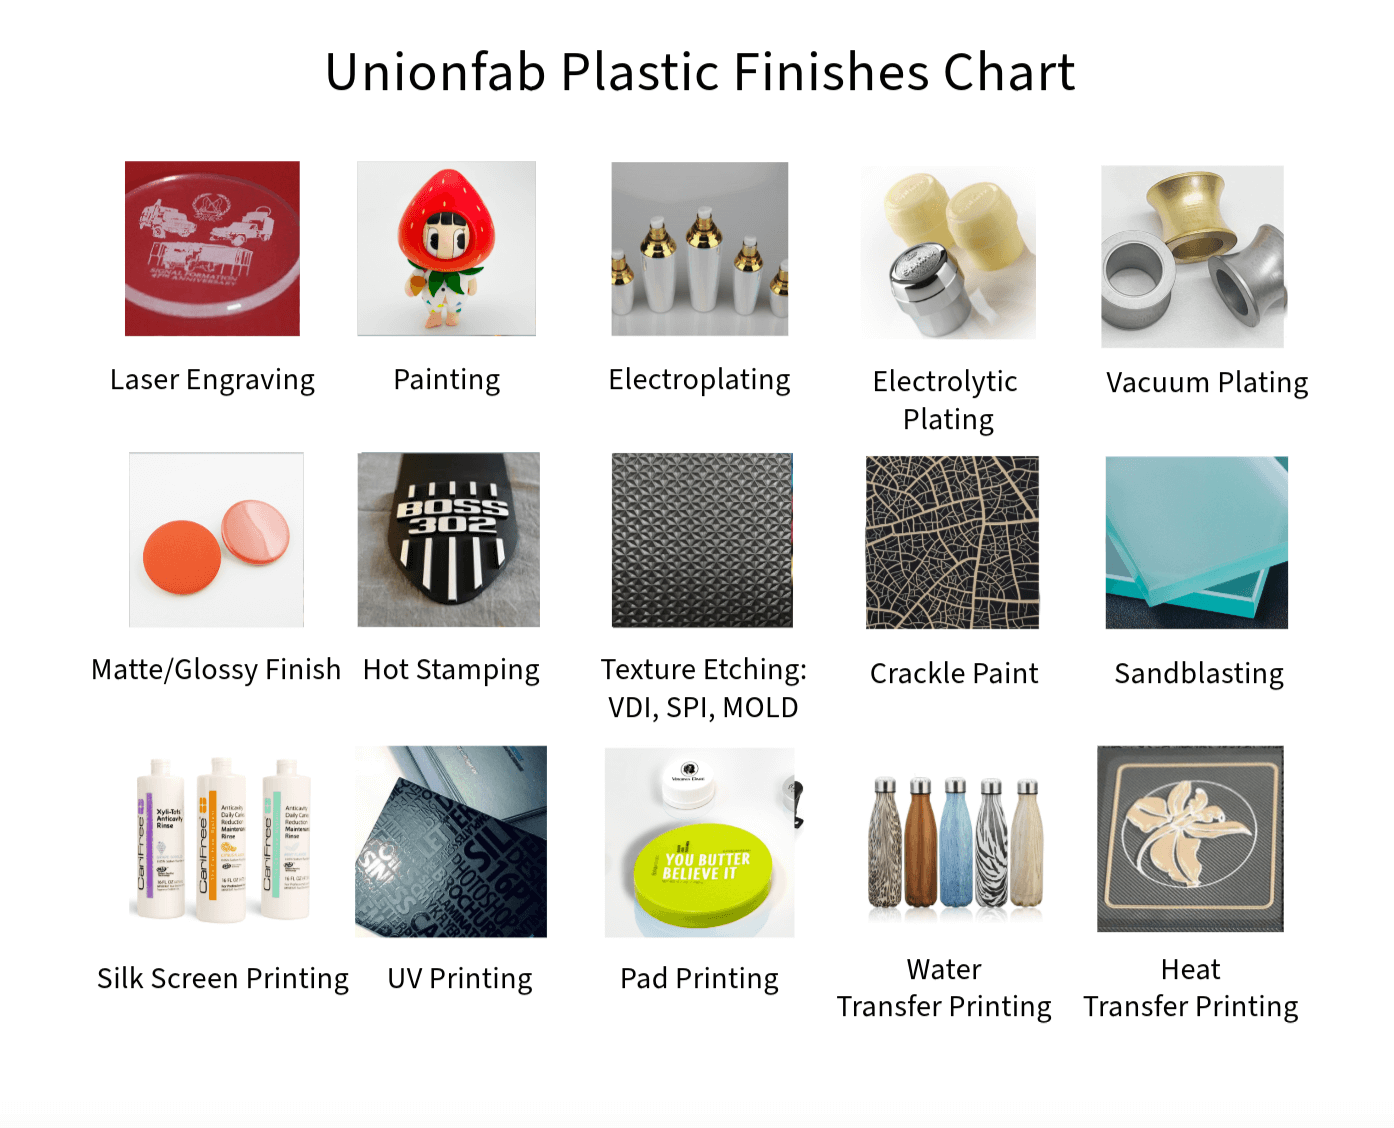
How Unionfab Can Help You Achieve Perfection
At Unionfab, we provide end-to-end post-processing services to help you achieve professional-grade finishes—whether it’s for visual appeal, precision fit, or production-ready durability.
What We Offer
Full-Process Smoothing: From coarse sanding to mirror polishing, we cover every step to ensure consistent, high-quality results.
Advanced Techniques: Our capabilities include vapor smoothing, resin or epoxy coating, and precision polishing, supported by industrial-grade equipment.
Batch Processing: We efficiently handle both single parts and large-volume orders, ideal for scaling from prototype to production.

Get Started in Minutes
Not sure which finishing method fits your needs?Check out our detailed guide: How to Choose Your Finishing Options
Or head directly to Unionfab.com to explore options and request a customized quote.
Need help? Our team is ready to assist. Contact us through our online chat or email for fast support.
Unionfab turns your printed parts into polished products—accurate, durable, and ready to impress.
